Save Time Setting Up Your Sakai Site with Templates

Take a lot of the guesswork out of having a well-organized, learner-centered Sakai site by using one of the new course templates. Whether you need a simple, streamlined site for basic course management or a comprehensive site with a range of instructional materials and tools, two new templates now give you more options for getting started.

What are templates?

If you’ve created a Sakai course site before, you’ve already used templates. A template is a selection of tools and, in some cases, other content like web pages that you can use as the basis for your site. After you’ve selected your course term, you can choose the template you want for your site.

The Default template is automatically selected when you create a site, and it includes a set of commonly used tools. Alternatively, some professional schools and Duke Kunshan University have their own templates.

Screenshot of Sakai Worksite Setup page showing radio buttons for selecting a course site or project site. Under the course site option, which is selected, there are options to choose the “Academic Term” and the “Site Template.” Currently, the “2020 Fall Term” and the “Duke Default Course Template” are selected. Below these options, you can also select to "Create site from archive." Once you've made your selections, you then choose "Select Course" to move to the next page.

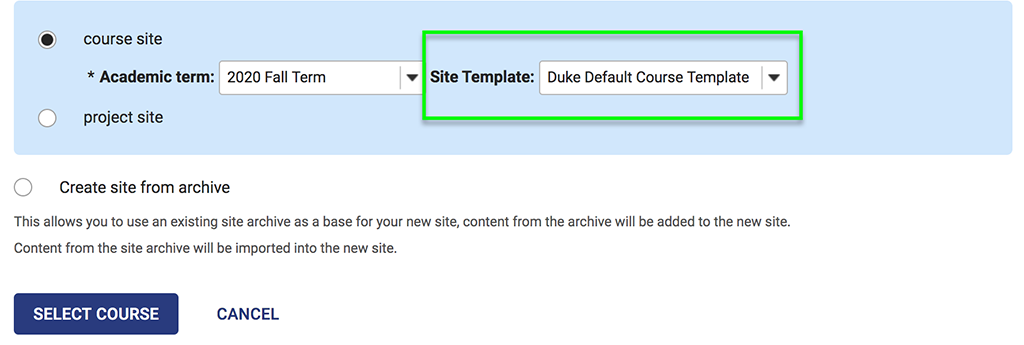
Now, when you go to select a template, you will have two new options: the Minimal and Advanced templates. These new templates go beyond the Default option to incorporate more best practices of student-centered course site design. These templates make it easy for you to organize your site and share important practical information while providing some of the core tools for learning and communication. While these templates can be used as-is, they also are customizable, so you can add and remove content and tools as you like.

Focus on the basics with the Minimal template

The Minimal template (see an example in Sakai) is a great choice if you want a streamlined site with some basic, practical information and a few tools for course management. This template includes a student-centered About page that’s easy to update, as well as the core tools for course communication: Announcements to send out updates to your students and Zoom for live class sessions and meetings. In addition, you can upload your syllabus and other files to the Resources tool to share them with students. The Minimal template is also a good option if you mainly want to add links to tools and platforms outside of Sakai, including Box, Sites@Duke (WordPress), and Duke Kits.

A screenshot of a course site in Sakai that is using the Minimal template. The site has a left-hand menu with an About page, which currently selected, as well as Announcements, Resources, Zoom, Site Info, and Help. The About Page has a course banner image that shows a photo of Duke Chapel taken from a distance with the sun to the right of it low in the sky. The Duke University logo is just below the sun in white. Below the course banner, there is text saying the following, "Welcome to our course. Glad you could join us! Check out these tips for success: Be on the lookout for email notifications in Announcements, Review the course files and Syllabus in Resources, Join upcoming meetings and review recordings in Zoom, and Have a Question? Reach your instructor at instructor@duke.edu.”

Create a guided learning experience with the Advanced template

The Advanced template (see an example in Sakai) is a great choice if you want to create an organized site with a variety of materials and tools. This template starts with an Overview page where you can put some basic course information like your name and email address and a brief course description.

A screenshot of a course site in Sakai that is using the Advanced Template. There is a left-hand menu with “Overview” at the top selected, then the following options: “Announcements, Getting Started, Weeks, Assignments, Zoom Meetings, Tests & Quizzes, Gradebook, Resources, Calendar, Email (Hidden), Site Info (Hidden), Warpwire (Hidden), and Help.” In the center box, there is a heading saying "Welcome" followed by a small banner image with a photo of Duke Chapel taken at a distance with the sun low in the sky to the right of the chapel. Below the sun is the Duke University logo in white. Below the banner image is the heading "Course Title" followed by "Instructor, Instructor Name, and Instructor Email Address.” Then, there is the heading "Course Description" followed by placeholder text (lorem ipsum filler text). On the far right there are two boxes--first, a box saying "Announcements," which is currently empty. Then, a box saying “Calendar” that shows the top of the June 2020 calendar.

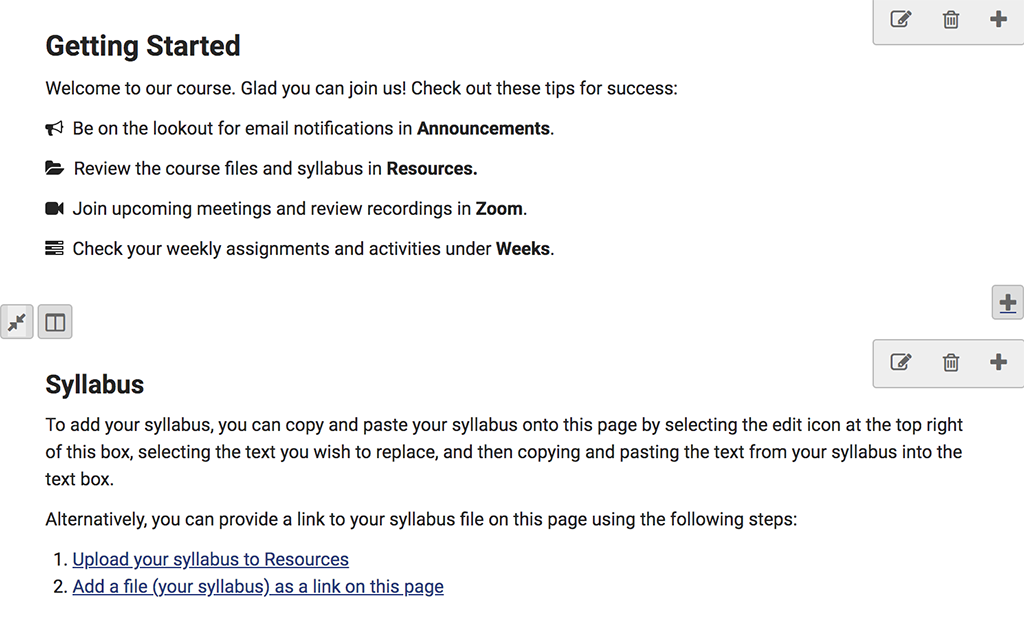
For a more in-depth introduction to the course, the Advanced template has a Getting Started page with 1) tips for how students can get started in the course and 2) a place for you to upload your syllabus.

A screenshot of the Getting Started page with two blocks of text. The first block has the heading "Getting Started" and then the text: "Welcome to our course. Glad you can join us! Check out these tips for success: Be on the lookout for email notifications in Announcements, Review the course files and syllabus in Resources, Join upcoming meetings and review recordings in Zoom, and Check your weekly assignments and activities under Weeks.” The second block has the heading "Syllabus" with the following text: “To add your syllabus, you can copy and paste your syllabus onto this page by selecting the edit icon at the top right of this box, selecting the text you wish to replace, and then copying and pasting the text from your syllabus into the text box. Alternatively, you can provide a link to your syllabus file on this page using the following steps: 1. Upload your syllabus to Resources and 2. Add a file (your syllabus) as a link on this page.” The statements for #1 and #2 are hyperlinked.

The Advanced template has a dropdown menu called Weeks that includes a page for each week of the semester where you can put information such as a weekly introduction, learning outcomes, readings and resources, and weekly assignments.

A screenshot of the Week 1 page of the Advanced template in Sakai. This page has a top-level heading of "Week 1" followed by the heading "Introduction" and this text: “Put a short introduction to the week here, such as a brief overview of the concepts and/or topics you will cover, guiding questions for the week, and why these concepts/topics are important.” Next, there is a heading for “Learning Outcomes” followed by the text: "By the end of this week, you will be able to: list what you want learners to be able to do, and write measurable and action-oriented goals.” The next heading is "Readings/Resources" and the text below it says "This is where you can list readings for the week, provide links to external resources or videos, or add links to files uploaded to the Resources folder in Sakai.” Finally, there is the heading "Learning Activities" followed by text that says, "This is where you can list and link to this week's assignments. To link directly to Sakai tools including Forums, Assignments, and Tests & Quizzes, select the plus button on the bottom right and then select one of the following: Link to an assignment, Link to a Test or Quiz, or Link to a Forum or Topic."

The Advanced template also includes a robust offering of commonly-used tools, including those for learning activities (Assignments and Tests & Quizzes), course communication (Announcements, Zoom Meetings, and Email), and other tools for course management (Gradebook, Resources, and Calendar). In addition, the template includes Warpwire so you can easily upload and share images, audio files, and videos.

With the Advanced template, you can provide more information about each unit or week of your course while taking advantage of multiple tools to enhance learning. This guided experience walks students through the course and makes it clear what they need to do and when. The template also allows you to be creative with your course site by adding multimedia, learning activities, and supplemental resources.

Whichever template you choose, by creating a clear and organized course site with useful information, you free up time for the best part of the course—the learning.

For more information about the templates or to get help with your course site, contact us.

We offered a workshop on “Creating Your Sakai Site Using the New Templates.” You can watch the recording and review the slides for more in-depth information and demonstration of the templates and how to customize them in Sakai.